ADL Terminal pull force tester is a kind of testing equipment to wiring harness and electronic industry, specifically used to test all kinds of wire terminals pulling-out force. The instrument can combine NK, HF force gauge and special fixture in testing. This instrument has characteristics of compact device,accurately controlling, high testing accuracy, convenient specimen clamping, simple operation, etc. It is the ideal equipment for wiring harness factory to ensure product quality.
- The base of instrument(As shown below)
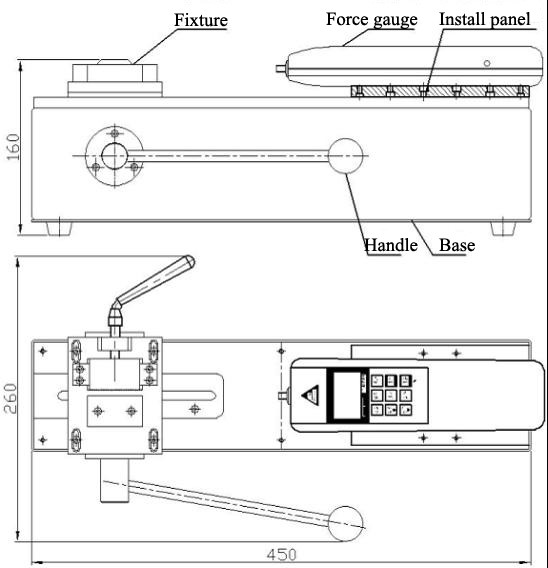
- Horizontal installation
- Manual operation, simple and stable.
- This machine can be installed on the table (platform) to make the frame more stable to use.
- Size: 45cm×26cm×16cm
- Effective stroke: 50mm
- Rated load: 500N (Can also be configured 1000N)
- Net weight: 10.6Kg
- The force gauge of the instrument:
The standard configuration of Terminal pull force tester is with digital force gauge (HF-500),you can also config with analog force gauge(NK-500), the price is different.
- Digital force gauge
- Type: HF—500
- Load:500N(Kg、N and Ib three units can be converted automatically)
- Resolution: 01N
- Precision: ±0.5%
- Output interface: RS 232 Nine holes socket
- Charging power: 110-220V/AC, Batteries continuous working time: 6-8 hours
- Stability: temperature drift: 2uV/℃(0~60℃); null drift: ≤ 0.1%/8hours/FS
- Calibration range: Full range calibration
- Environmental temperature: 0~+60℃
- Environmental humidity:≤ 80%
- Allow overload: 150%
- Supply power mode: No. 5 Ni-MH battery, 220V AC, charging for 4-6 hours
- Analog force gauge
- Type: NK—500
- Load:500N(50kg)
- Push pull rod trip: 10mm
- Working temperature: 20℃±10℃
- Transportation temperature:-27℃~+70℃
- Relative humidity: 15%~80%RH
- Working environment: No seismic focus around and corrosive medium.
Customers can according to requirements to configure different kind force gauge:
Specifications of analog force gauge: NK—10、20、30、50、100、200、300、500
Specifications of digital force gauge:HF—2、5、10、20、50、100、200、500、1000 etc.
- Instrument left fixture
- Size: 115mm×180mm×30mm
- Applicable scope: mainly used in Mating &Unmating Force Test and wire terminals pulling-out force testing.
- Standard load: maximum. Load: 1000N
- Instrument right fixture
- Type: AJJ-06
- Applicable scope:Various cables, glass, leather, various electric components etc. material’s tension tests,collapsing force tests, strength tests slide, terminal testing and so on.
- Standard load: 500N, Maximum. Load: 1000N
- Instrument installation method
- The installation method of base
This instrument can be installed on the table to make the instrument more stable. Please ensure that the working plat is horizontal, to make the testing more accurate. When installation, please refer to(Longth x width: 430mm×80mm, 4 M4 tapped hole)
- The installation method of force gauge
- Use the M4 wrench to loosen the 4 M 4×16 hex socket screws on the force gauge mounting plate, unscrew the force gauge mounting plate.
- When installing HF series digital force gauge, using the M4 allen wrench to make the 4 pieces M4×10 hex socket screws in the accessory bag pass through the 90×40 holes on the force gauge mounting plate, screwing into the 4 M4 tapped hole, install the force gauge onto the mounting plate. Or using the cross screwdriver make the 4 pieces M3×10 cross recess head screws in the accessory bag pass through force gauge, to install the force gauge onto the mounting plate. Screwing the 4 pieces M3 into 145×30 hole on mounting plate.
- When installing NK series analog force gauge, unscrew the 4 pieces M×10 screws by cross screwdriver, to make the 4 pieces M3×14 cruciform slot screws pass through the 145×30 mounting holes on mounting plate, screwing into 4 pieces M3 tapped holes(unscrew M3×10 screws).
- After installing the force gauge, using M4 socket head wrench to install the force gauge mounting plate on the test stand again.
- The installation method of left fixture
Using the M4 socket head wrench to make the 4 pieces M4×10 socket head cap screws in the accessory bag pass through the 4 regulation holes on left fixture mounting plate, screwing into the 4 M4 tapped holes on the test sand base plate.
- The installation method of right fixture
Screwing the M6 screw nut in accessory on the force gauge rod, then screw the right fixture on the force gauge rod,adjust the M6 screw nut to make the right fixture contact firmly.
- Put one end of wire connecting terminal into the mouth of left fixture, turning handle to clamp the wire part(end of wire connecting terminal has been pressed)
- Put the other end of wire connecting terminal into the mouth of right fixture, turning handle to keep the end of wire connecting terminal stucking in the middle.
- Aiming the left fixture centre at right fixture centre by M4 socket head wrench.
- If installed the HF series digital force gauge,turn on the power,when the LCD display zero is ok.
- If installed the NK series analog force gauge, press the switch button to make it turn to Zero.
- Turn the handle, make the left fixture move left, and make the right fixture lock the terminal.
- Daily maintenance and maintenance
- Do not use overload, the instrument rated load is 500N .
- Note the daily maintenance work, maintain equipment parts clean.
- When the machine go wrong, please contact manufacturer or the place you bought( Do not Remove and repair unauthorized).


